
How to Schedule Send Your Slack Messages
- rayshana7077
- Jun 13, 2025
- 4 min read
What is Schedule Send
Schedule Send lets you set up your bulk Slack messages to be sent automatically at a future date and time. Instead of sending messages immediately, you can schedule them to go out when your community members are most likely to see them.
Before You Start
Before creating your first scheduled message, make sure you have completed the basic setup. You'll need at least one Slack bot configured in the "Set up Slack accounts" section of the add-on. Your bot should be tested and working properly for immediate sends.
Additionally, ensure your Google Sheet contains all the recipient data and message content you want to send. The scheduling feature uses the same column mapping as regular sends, so if you can send messages immediately, you're ready to schedule them too.
Step-by-Step: Creating a Scheduled Message
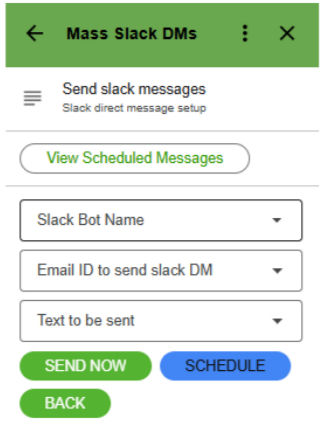
Start by opening the Mass Slack DMs add-on in your Google Sheet and navigate to the "Send slack messages" section. You'll see the familiar interface where you select your Slack bot, email column, and message column from the dropdown menus. Fill these out exactly as you would for an immediate send. Instead of clicking "SEND NOW," look for the blue "SCHEDULE" button next to it.
The scheduling screen will show you a date picker, time picker, and timezone selector. Choose your desired date using the calendar interface. For the time, you can only select times at the start of each hour (1:00, 2:00, 3:00, etc.). This is a limitation that we'll explain more about later.
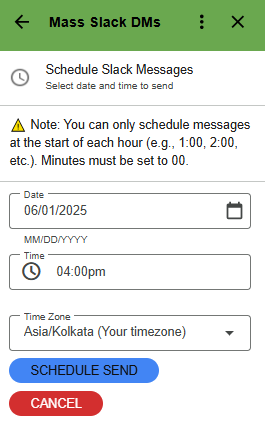
Pay special attention to the timezone dropdown. It defaults to your Google account's timezone, but you can change it to ensure your messages go out at the right time for your audience. The system will automatically convert your selected time to the appropriate timezone when sending.
After setting your date, time, and timezone, click "SCHEDULE SEND" to create your scheduled message. You'll see a confirmation message showing when your messages are scheduled to be sent. The add-on will also update the interface to show that this file now has an active schedule.
When it's time to send, you'll get a slack notification that sending has started, and a final notification when it's complete with the results.
Managing Your Schedules
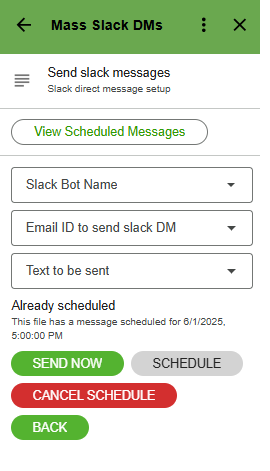
After creating a schedule, you'll notice the interface changes to show your scheduled status. You'll see a message like "Already scheduled - This file has a message scheduled for [date/time]" along with a "CANCEL SCHEDULE" button if you need to make changes.
To view all your scheduled messages across different files, look for the "View Scheduled Messages" button that appears at the top of the send messages section. This opens a separate spreadsheet where you can see all your active, completed, and cancelled schedules in one place.
Each schedule shows important details including the original file name (as a clickable link), scheduled time, current status, and when it was created. The status will show as "PENDING" until it's time to send, then "RUNNING" while sending, and finally "COMPLETED" or "PARTIAL" depending on the results.
If you need to cancel a schedule, simply click the "CANCEL SCHEDULE" button in the original file. This immediately removes the schedule and deletes the automated trigger. You'll get a confirmation message, and the interface will return to normal, allowing you to create a new schedule if needed.
Important Rules & Limitations
You can only schedule messages at the start of each hour. This means you must select times like 9:00, 10:00, or 2:00 - you cannot choose 9:30 or 10:15. This restriction exists because Google Apps Script, which powers our add-on, only allows time-based triggers at hourly intervals. If you try to select a time with minutes other than :00, you'll see an error message asking you to choose an hourly time.
You can only have one active schedule per Google Sheet file. If you try to create a second schedule for the same file, the system will prevent this and show you the existing schedule details. To create a new schedule for the same data, you must first cancel the existing schedule, then create the new one. This limitation helps prevent accidental duplicate sends and keeps your schedule management simple.
Schedules can be created up to 3 months in advance, but no further. If you try to schedule beyond 3 months, you'll receive an error message.
The system uses Google's trigger system, which limits each user to a maximum of 20 active schedules at any time. If you're managing many scheduled messages, you might see an error when trying to create your 21st schedule. When this happens, you'll need to wait for some schedules to complete automatically or cancel schedules you no longer need before creating new ones.
For schedules that partially complete (some messages sent, others not), this usually happens when the sending process hits Google's 6-minute execution time limit for add-ons. The system will notify you about partial completion and mark which messages were not sent. You can manually send the remaining messages or create a new schedule for the unsent items.

Comments